
Introduction to Baked Italian Subs
Baked Italian Subs are not just any sandwich—they're a delightful combination of robust, flavorful ingredients that can turn your lunch or dinner into a culinary experience. With busy schedules, many young professionals find it challenging to prepare satisfying meals that don’t require hours in the kitchen. That’s where baked Italian subs come in!
Why Baked Italian Subs are a Game-Changer for Busy Young Professionals
Picture this: you’ve just finished a long day at work, and the last thing you want to do is spend an hour whipping up dinner. Luckily, baked Italian subs can be your go-to solution! The prep time is only about 15 minutes, allowing you to throw together a delicious meal without the hassle. Simply layer your choice of sliced meats like chicken ham, savory cheeses, and tasty toppings between hoagie rolls.
Plus, the best part? You can easily customize them to your liking. Want to add some spice? Toss in jalapeños or extra pepperoncini! Craving vegetarian? Swap the meats for grilled veggies. According to the USDA, using high-quality ingredients not only enhances flavor but can also improve your overall health (USDA Dietary Guidelines).
Next time you’re pressed for time, give these sub sandwiches a try. They’re not just quick and easy; they’re also scrumptious and super satisfying!
Ingredients for Baked Italian Subs
Essential ingredients for delicious subs
To create mouthwatering baked italian subs, you'll want to gather some essential ingredients that make these sandwiches truly shine:
- Hoagie rolls: Choose fresh rolls that will hold all the fillings.
- Unsalted butter: This is for our garlic butter spread—don’t skip it!
- Grated Parmesan cheese: Adds a rich, nutty flavor.
- Garlic powder & Italian seasoning: These will infuse your subs with an aromatic punch.
- Provolone cheese: Melts beautifully and brings a creamy texture.
- Sliced chicken ham, Genoa salami, and deli pepperoni: These delicious meats create a perfect protein-rich combination.
- Pepperoncini peppers: A tangy kick that perfectly complements the riches of the meats.
Optional add-ins for personalization
Feel free to get creative with your baked italian subs! Some optional add-ins to consider include:
- Vegetables: Sliced bell peppers or spinach for added freshness.
- Dressings: A drizzle of Italian dressing or a smear of mayonnaise can bring added moisture.
- Spices: Extra red pepper flakes for heat, or fresh herbs for a burst of flavor.
Experimenting with these suggestions not only personalizes your experience but elevates your homemade subs to a new level! Ready to craft your perfect sandwich? Let’s get started!
Step-by-Step Preparation of Baked Italian Subs
Creating delicious baked Italian subs at home is a fun and rewarding experience that should be enjoyed by everyone. Let’s dive into the preparation process, which is straightforward and perfect for lunch or dinner!
Preheat the oven and prepare the rolls
To kick things off, preheat your oven to 375°F (190°C) to ensure it’s ready for action once you’ve assembled your subs. While the oven warms up, grab 4 hoagie rolls and slice them in half lengthwise, being careful not to cut all the way through—think of it as creating a pocket for all the delectable fillings to come! Place your open rolls on a sheet tray, ready to be transformed into something magnificent.
Create the garlic butter spread
Next up, let’s whip up a rich and flavorful garlic butter spread. In a small bowl, combine ½ cup of softened unsalted butter, 1 tablespoon of grated parmesan, 1 teaspoon of garlic powder, and ½ teaspoon of Italian seasoning. Mix everything together until it forms a smooth, aromatic paste. This spread not only enhances the flavor of your subs but also adds that delightful golden crispiness to the toasted hoagie rolls.
Toast the hoagie rolls
Now, take that flavorful garlic butter and generously spread it over the exposed sides of your hoagie rolls. Once that’s done, place the buttered rolls directly in the oven for about 5 minutes. You want them to be lightly toasted, creating that perfect foundation for your fillings while enhancing the overall flavor with a subtle crunch.
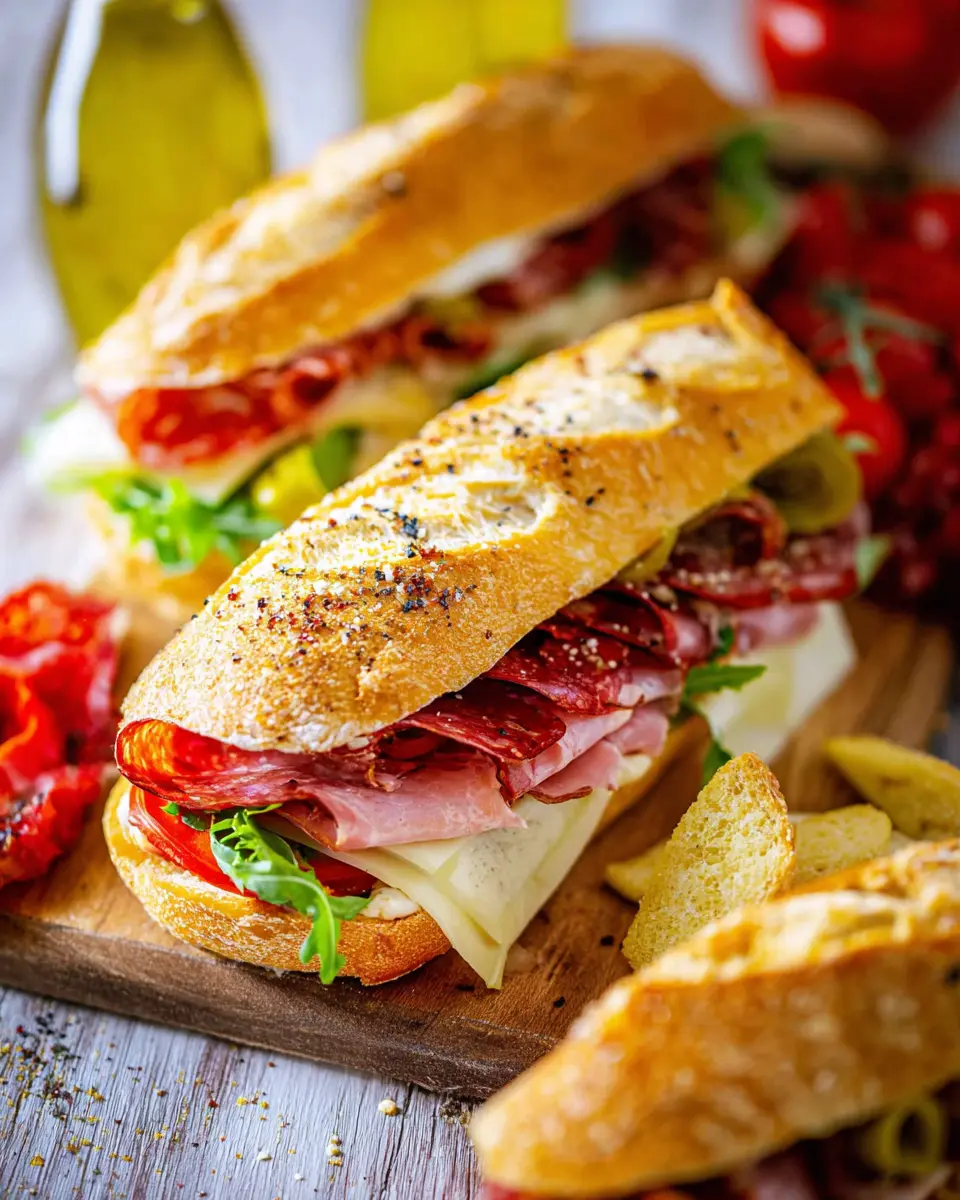
Layering the cheese and meats
After your rolls have been toasted, it’s time to load them up! Start by placing a slice of provolone cheese on the bottom half of each roll. Next, it’s time to add the delicious meats: 8 ounces of chicken ham, 4 ounces of Genoa salami, and 12 slices of deli pepperoni. Don’t forget to sprinkle some sliced pepperoncini peppers on top to add a zesty kick. For an extra cheesy goodness, top with another slice of provolone cheese. Repeat this layering process for each hoagie roll until all ingredients are used.
Bake and enjoy the melted goodness
Finally, place your assembled subs in a 9x13 baking dish, folding the top halves over the fillings. Bake them in the preheated oven for an additional 10-15 minutes until the cheese is melty and gooey, and the bread is beautifully golden brown. The heavenly aroma wafting through your kitchen will have everyone gathering around in anticipation! Once they’re out of the oven, serve immediately and enjoy the scrumptious explosion of flavors in your homemade baked Italian subs.
Remember, these subs are versatile and can be customized with additional ingredients like roasted red peppers or different cheeses. Happy cooking!

Variations on Baked Italian Subs
Veggie-loaded Italian Subs for a lighter option
If you're in the mood for something a bit healthier but just as delicious, consider crafting veggie-loaded baked Italian subs. Start with a fresh hoagie roll and layer on a vibrant mix of vegetables—think spinach, roasted bell peppers, zucchini, and red onions. Add your favorite cheese, such as mozzarella or feta, for added richness. Top it off with a drizzle of balsamic glaze for that perfect zing. These baked Italian subs offer a satisfying crunch and pack a punch of flavor, showing that lighter options can still be indulgent!
Spicy Italian Subs with added heat
For those who crave a kick, spicy Italian subs are a game-changer! Begin with the classic base of your hoagie roll, loaded with chicken ham, Genoa salami, and pepperoni. To ramp up the heat, sprinkle in sliced jalapeños or banana peppers and a few dashes of hot sauce. You can even swap out provolone for pepper jack cheese for an extra cheesy, spicy delight. These subs will tantalize your taste buds and keep you coming back for more. Check out this spicy ingredient guide to explore even more heat options!
With these variations, your baked Italian subs will never be boring again!
Baking Notes for Baked Italian Subs
Tips for the Perfect Garlic Butter
Creating the ideal garlic butter is essential for your baked Italian subs. For the best flavor, use fresh garlic instead of powder if you have it on hand. Mix softened unsalted butter with grated parmesan, garlic powder, and a pinch of Italian seasoning. This flavorful spread not only enhances the taste but also gives the bread a lovely golden crisp when baked.
Adjusting for Moisture and Flavor
Feeling like your subs need a touch more moisture or zing? Consider adding a splash of Italian dressing or olive oil mixed with a splash of vinegar. These additions can elevate the flavor and add delicious moisture without overpowering the other ingredients. A little mayo is also a great option if you prefer creaminess!
Remember, you can always customize your subs with your favorite veggies and extra toppings to make them uniquely yours! For additional ideas, check out our guides on enhancing flavor.

Serving Suggestions for Baked Italian Subs
Best sides to complement your subs
When serving baked Italian subs, consider classic sides that enhance their delicious flavors. Crispy potato chips or bbq chips complement the richness of the subs perfectly. For a fresher touch, try a side salad tossed with Italian dressing or a classic potato salad. You could also serve some cole slaw for a crunchy contrast that brightens the meal. If you're feeling a little adventurous, homemade marinated vegetables can add a delightful twist.
Creative ways to serve for gatherings
For parties or gatherings, stack your baked Italian subs on a platter, cut into smaller portions for easy sharing. Adding a variety of toppings like pepperoncini, olives, and pickles allows guests to customize their experience. Offer a selection of sides in individual cups – think mini salads or chips – for a fun and casual presentation. Don't forget to include some delightful dipping sauces like balsamic vinegar or herbed mayo to elevate the flavors. Making your subs interactive will keep conversations lively and the vibe friendly!
Cooking Time Breakdown for Baked Italian Subs
Preparation Time
The prep time for these baked Italian subs is a quick 15 minutes. This stage involves gathering your ingredients and mixing the flavorful garlic butter that elevates your sandwiches to a whole new level. Think of it as your secret weapon for infusing delicious flavor!
Cooking Time
In just 20 minutes, your oven will transform your ingredients into immense satisfaction. The first 5 minutes let the hoagie rolls get a little toasty, while the remaining time ensures that the cheesy, meaty goodness melds perfectly.
Total Time
You can enjoy a hearty meal in just 35 minutes from start to finish. This is perfect for busy weeknights or a weekend gathering with friends. Why not serve these delightful subs alongside some crunchy potato chips or a fresh salad to round out your meal?
Nutritional Facts for Baked Italian Subs
Caloric Content and Macronutrients
One serving of these Baked Italian Subs contains approximately 804 calories. Each sub packs a protein punch with 36 grams, thanks to the combination of chicken ham, provolone cheese, and pepperoni. The sandwich is also rich in fat at 58 grams, including 29 grams of saturated fat, making it a deliciously indulgent choice.
Key Vitamins and Minerals
These Baked Italian Subs offer a range of essential vitamins and minerals, with notable contributions of:
- Calcium: 326mg, important for bone health.
- Iron: 12mg, crucial for energy production.
- Vitamin A: 1085 IU, beneficial for vision and immune function.
For more in-depth nutritional insights, check out resources like the USDA FoodData Central.
FAQs about Baked Italian Subs
Can I make these subs ahead of time?
Absolutely! You can prepare the baked Italian subs a few hours in advance. Just assemble them as per the recipe, cover with aluminum foil, and refrigerate. When you're ready to eat, simply pop them in the oven to warm through and get that cheese melting again!
What are the best meat alternatives?
If you're looking for meat alternatives for your baked Italian subs, consider using grilled veggies like zucchini and bell peppers or marinated tofu for a hearty option. If you prefer a meaty substitute, smoked turkey or chicken ham can deliver great flavor without sacrificing texture.
How to store leftovers properly?
To keep your leftover baked Italian subs fresh, wrap them tightly in plastic wrap or aluminum foil. Store them in the refrigerator for up to 2-3 days. When you’re ready to enjoy, you can reheat them in the oven until warmed through—just be sure to keep the foil on to retain moisture! For more on storage tips, check out FoodSafety.gov.
Conclusion on Baked Italian Subs
Your new go-to homemade meal awaits!
In just 35 minutes, you can whip up baked Italian subs that will satisfy your taste buds like never before! With layers of savory chicken ham, melty provolone, and zesty pepperoncini, this recipe is bound to become a staple in your meal rotation. Enjoy!

Baked Italian Subs
Equipment
- oven
- sheet tray
- 9x13 baking dish
- small bowl
- Knife
Ingredients
Baked Italian Subs
- 4 rolls hoagie
- 0.5 cup unsalted butter softened
- 1 tablespoon grated parmesan
- 1 teaspoon garlic powder
- 0.5 teaspoon Italian seasoning
- 8 slices provolone cheese
- 8 ounces sliced tavern ham
- 4 ounces sliced Genoa salami
- 12 slices deli pepperoni
- 0.25 cup sliced pepperoncini peppers
Instructions
Preparation Steps
- Preheat the oven to 375F and slice your hoagie rolls in half lengthwise. Do not cut all the way through. Place them cut side open onto a sheet tray.
- Add the softened butter, parmesan, garlic powder, and Italian seasoning to a small bowl and mix to create a garlic butter.
- Stir until everything is well combined.
- Using a knife, spread the garlic butter over the exposed hoagie rolls evenly.
- Place the buttered rolls in the oven and bake them for 5 minutes or until they're lightly toasted.
- Cut a piece of cheese in half and place it on the bottom part of the hoagie roll. Repeat with the other rolls.
- Add ham, salami, and pepperoni, all on top of the cheese, evenly distributed on all of the sandwiches.
- Add the sliced pepperoncini next. Cut another piece of cheese in half and place it on top of the meat. Repeat the layering of cheese and meat with the rest of the sandwiches.
- Close the top piece of bread on the sandwiches and place them into a 9x13 baking dish or one similar in size so all the sandwiches fit. Bake them for another 10-15 minutes until the cheese is melted and the sandwiches are warmed through and bread is toasted. Serve immediately and enjoy.


Leave a Reply