
Introduction to Baked Sweet and Sour Chicken
If you’re a young professional navigating the busy whirlwind of work and social life, you know how crucial it is to have quick, flavorful meals at your fingertips. That's where baked sweet and sour chicken comes in! This recipe is a delightful twist on the classic dish, offering all the taste without the hassle of deep frying. With just 40 minutes from prep to plate, it fits perfectly into any hectic weeknight.
What truly makes this recipe a game-changer is its simplicity. The chicken is baked to crispy perfection in just 20 minutes, allowing you to multitask or relax a bit while dinner cooks. The sauce strikes that ideal balance between sweet and tangy, using less sugar and incorporating unique ingredients like Worcestershire and oyster sauce for a flavor that rivals your favorite Chinese takeout spots. No more settling for mediocre options; a home-cooked meal can be as satisfying and delicious as an outing.
For a fun twist, consider pairing this dish with cauliflower rice for a low-carb option or a simple fried rice to impress your friends at dinner parties. Ready to dive in? Let’s get cooking!
For more ideas, check out this blog on batch cooking to maximize your meal prep!
Ingredients for Baked Sweet and Sour Chicken
When preparing delicious Baked Sweet and Sour Chicken, selecting the right ingredients is crucial for building flavors that pop. Here's a breakdown to make your shopping easier.
Essential chicken ingredients
For the star of the show, you’ll need:
- 1 lb (500 g) chicken breast: Cube it into bite-sized pieces for even cooking and crispiness.
- Salt: A simple yet effective enhancer for the chicken's flavor.
- Egg: Acts as a binder to help the cornstarch stick to the chicken.
- Cornstarch: Creates that crispy exterior we all crave!
- Oil: A bit of vegetable or canola oil for frying and baking is essential.
Key ingredients for the sauce
The magic of your sweet and sour chicken lies in the sauce. Gather these key components:
- Sugar: Balance is key; use ½ cup of white or brown sugar.
- Apple cider vinegar: Adds a tangy depth to the sauce.
- Pineapple juice: A splash from your canned pineapple to brighten the flavor.
- Ketchup, Worcestershire sauce, soy sauce, and oyster sauce: These secret ingredients elevate the sauce to restaurant-quality!
Vegetable essentials for a vibrant dish
To add freshness and crunch, be sure to include:
- Onion: Dice it up for sweetness and texture.
- Bell peppers: A mix of red and green adds color and nutrition.
- Canned pineapple pieces: Sweet and juicy, these help tie the flavors together.
With these ingredients, you’ll be well on your way to creating a delightful baked sweet and sour chicken that rivals any takeout! Check out our complete recipe for the cooking instructions.
Preparing Baked Sweet and Sour Chicken
Preparing baked sweet and sour chicken is a delightful experience that elevates your weeknight meals. This dish stands out not only for its vibrant flavors but also for its healthier approach compared to traditional frying methods. Let’s dive into the preparation!
Step 1: Preheat Your Oven
Start by preheating your oven to 200°C (390°F). This ensures your chicken will reach that coveted crispy texture as soon as it hits the heat. An adequately preheated oven is crucial for that perfect finish, so don’t skip this step!
Step 2: Prepare the Chicken
While the oven warms up, take 1 lb (500 g) of chicken breast and cut it into bite-sized cubes. In a bowl, sprinkle the chicken with ½ teaspoon of salt and pour in 1 large egg (or 2 small eggs). Mix well until the chicken is coated. Make sure to drain any excess egg afterward to ensure even coating later on.
Step 3: Coat the Chicken in Cornstarch
Grab a large ziplock bag and place 1 cup of cornstarch inside. Add the chicken pieces one by one. Seal the bag and shake it to coat the chicken thoroughly in cornstarch. This step is essential for achieving that crispiness we all love. Discard any excess cornstarch left in the bag.
Step 4: Briefly Pan-Fry the Chicken
Heat 3 to 5 tablespoons of oil in a large skillet over high heat. Add the chicken in batches if necessary, so it doesn't overcrowd the pan. Cook for about 2 minutes, turning frequently until the outer layer turns a light golden brown. Remember, the chicken should still be raw inside as it will finish cooking in the oven.
Step 5: Bake to Crispy Perfection
Transfer the partially cooked chicken to a baking tray and give it a spritz of oil spray. Pop it into the preheated oven and bake for 15 to 20 minutes. This step is where the chicken transforms into the crisp, tender bites you’re looking for!
Step 6: Create the Sweet and Sour Sauce
While the chicken bakes, it's time to focus on the sauce. Discard the leftover oil from the skillet and wipe it down with a paper towel. Add ½ tablespoon of oil and sauté 1 minced garlic clove for about 20 seconds. Toss in 1 diced onion and cook for 2 minutes. Then, add ½ red bell pepper and ½ green bell pepper, cooking for another minute.
Now, add the sauce ingredients (including pineapple juice) and stir until the sugar dissolves and the mixture starts bubbling. Finally, mix 1 tablespoon of cornstarch with 4 tablespoons of water, add that to the sauce, and simmer until it achieves a syrupy consistency.
Step 7: Combine Chicken with Sauce and Serve
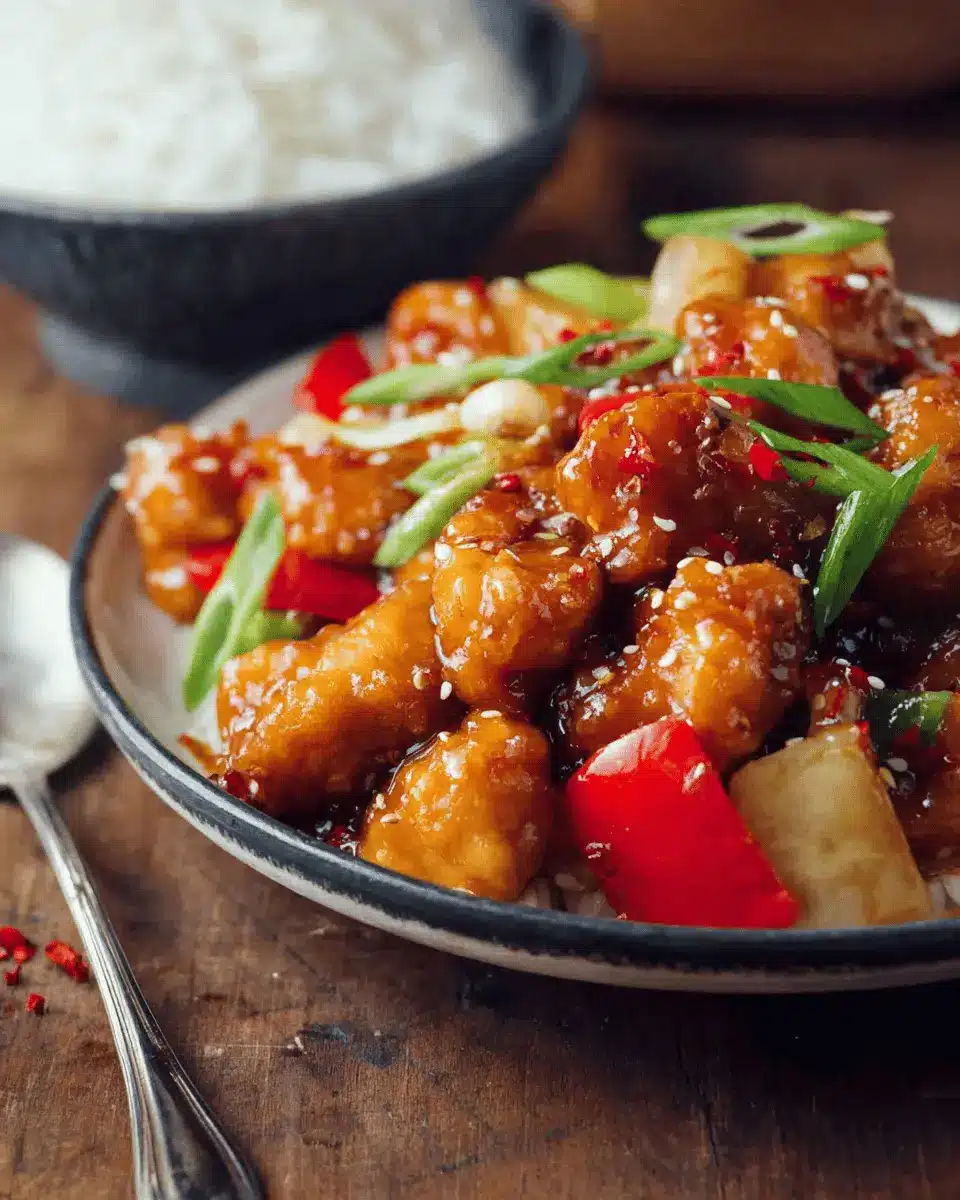
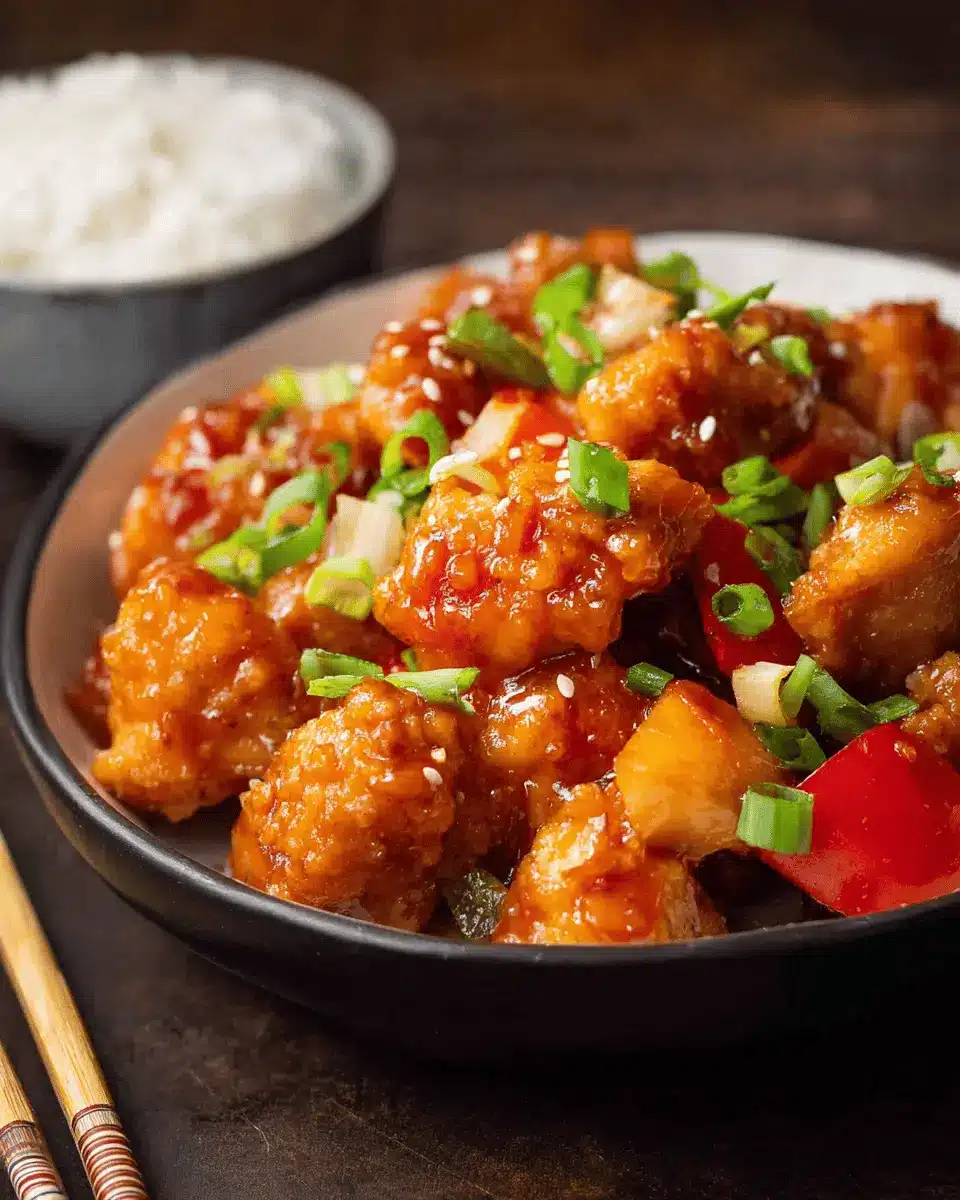
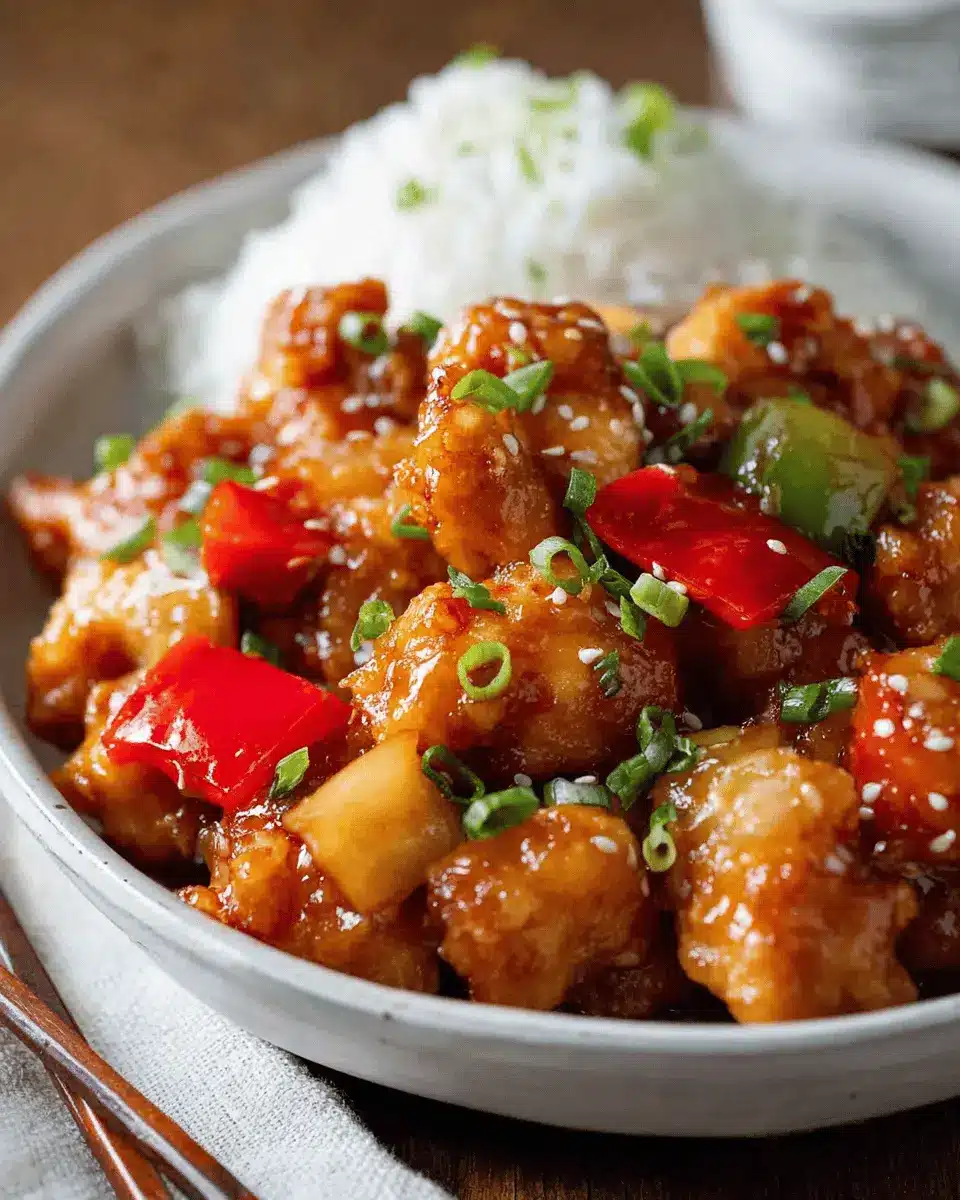
Once your chicken is golden and crispy, toss it into the skillet with the sauce and mix until thoroughly coated. Baked sweet and sour chicken can be served immediately over rice or with a low-carb option like cauliflower rice. Don’t forget to garnish with some scallions for added flair!
Trying this method comes with the rewarding crunch of baked chicken, making baked sweet and sour chicken a dish that will impress everyone at your table!
Variations on Baked Sweet and Sour Chicken
Tropical Twist with Added Mango
Elevate your baked sweet and sour chicken with a delightful tropical twist by tossing in some diced mango. This addition infuses your dish with a hint of sweetness and an exotic flair. Simply mix the ripe mango cubes with the pineapple before adding them to the sauce. Not only does it enhance the flavor, but it also adds vibrant color to your plate, making your meal as appealing as it is delicious!
Vegetarian Version with Tofu or Chickpeas
Craving a vegetarian spin on this dish? Swap the chicken for tofu or chickpeas! If using tofu, opt for firm varieties; toss it in the marinade for a good soak. If chickpeas are your choice, just mix them in during the final stages of cooking. Both options will absorb the scrumptious sauce, delivering a hearty meal that everyone can enjoy. Plus, they provide a great source of protein and fiber!
For more variations and ideas, check out Serious Eats for additional inspiration.
Cooking Tips and Notes for Baked Sweet and Sour Chicken
Tips for Achieving Crispiness
To ensure your baked sweet and sour chicken is wonderfully crispy, focus on the coating process. After mixing the chicken with egg, shake off the excess before dredging it in cornstarch. The light layer of oil when baking is crucial too—don’t skip that oil spray! Baking at a high temperature helps achieve that golden crust without drying out the chicken.
Adjusting Sweetness and Acidity
Everyone’s taste is different, so feel free to tweak the sweet and sour sauce. Start with the recommended sugar and vinegar amounts but adjust them to your liking. If you prefer a sweeter sauce, add a touch more sugar, or balance it out with extra vinegar for that tangy kick. Remember, the goal is to create a flavor that suits your palate perfectly!
For more tips on sweet and sour dishes, check out this article.
Serving suggestions for Baked Sweet and Sour Chicken
Pairing with Rice or Cauliflower Rice
When it comes to the perfect base for your baked sweet and sour chicken, you can’t go wrong with steamed white rice or brown rice for a wholesome touch. If you’re aiming for a low-carb option, cauliflower rice makes a fantastic substitute! It absorbs the sweet and tangy flavors of the sauce beautifully, ensuring every bite is packed with taste. If you want to level up your rice game, consider adding some sautéed veggies or a sprinkle of sesame seeds for extra flavor and crunch.
Garnishing and Presentation Ideas
Presentation is key! Elevate your dish by garnishing with chopped scallions or sesame seeds, which not only add a pop of color but also enhance the flavor. For a refreshing touch, consider serving it with a side of sliced cucumbers or a simple mixed greens salad dressed with a light vinaigrette. Arranging the baked sweet and sour chicken on a platter surrounded by colorful bell pepper rings can create an inviting and appetizing display. Don’t forget to drizzle any remaining sauce on top for that restaurant-style finish!
Time Breakdown for Baked Sweet and Sour Chicken
Preparation Time
With just 15 minutes of prep time, you can easily gather your ingredients and get everything ready for a delightful family meal. Don't forget to chop up your veggies and measure out your sauce ingredients for an efficient cooking experience!
Cooking Time
The baked sweet and sour chicken takes 25 minutes in the oven. During this time, you’ll get lovely, crispy chicken without drying it out. You can even whip up a quick side of rice or cauliflower rice while it bakes!
Total Time
In just 40 minutes, you can have a flavorful, homemade baked sweet and sour chicken on the table. It’s perfect for weeknight dinners or a casual gathering with friends. Looking for tips on how to make your meal even more efficient? Check out these meal prep strategies that will help you streamline your cooking process!
Nutritional Facts for Baked Sweet and Sour Chicken
Calories Per Serving
Each serving of baked sweet and sour chicken contains approximately 528 calories. This makes it a satisfying meal that balances flavor with nourishment.
Protein Content
With about 33 grams of protein in every serving, this dish not only fills you up but also supports muscle health and overall energy levels.
Key Vitamins and Minerals
This delectable meal is rich in essential vitamins and minerals, including vitamin C from bell peppers and pineapple, which support immune health, and potassium from chicken and onions, important for heart function. Enjoy a colorful plate filled with nutrition!
For more details on the health benefits of the ingredients, check out Healthline's article on nutrient-rich foods.
FAQ about Baked Sweet and Sour Chicken
Can I make this recipe ahead of time?
Absolutely! The beauty of this baked sweet and sour chicken is that you can prep it in advance. Marinate the chicken and prepare the sauce the day before, then store them separately in the fridge. On the day you want to enjoy it, simply bake the chicken and combine it with the sauce—easy and delicious!
What should I serve with the chicken?
This dish pairs perfectly with a variety of sides. Steamed white rice or brown rice is a classic choice, enhancing the flavor of the sauce. If you're looking for a healthier alternative, try serving it with cauliflower rice or a fresh side salad tossed in a light vinaigrette. The tangy sauce complements the simplicity of these sides wonderfully.
How can I store leftovers?
To keep your baked sweet and sour chicken fresh, store the leftovers in an airtight container in the refrigerator for up to three days. When you're ready to enjoy them again, simply reheat in the oven or microwave. For longer storage, consider freezing the chicken and sauce separately—the flavors will still shine when thawed!
Conclusion on Baked Sweet and Sour Chicken
In summary, this baked sweet and sour chicken is a delightful twist on a classic dish that balances flavor and health. Ready in just 40 minutes, it offers a satisfying crunch and rich taste without overwhelming sweetness. Serve it over rice for a tasty, comforting meal that everyone will love!

Baked Sweet and Sour Chicken
Equipment
- oven
- skillet
- Ziplock bag
- Baking tray
Ingredients
Chicken
- 1 lb chicken breast, cut into bite size cubes
- ½ teaspoon salt
- 1 large egg, lightly beaten or 2 small eggs
- 1 cup cornstarch placed in a large ziplock bag
- 3 to 5 tablespoon oil vegetable or canola
- oil spray
Stir Fry
- ½ tablespoon oil
- 1 clove garlic
- 1 small onion, cut into large dice
- ½ red bell pepper, cut into bite size pieces
- ½ green bell pepper, cut into bite size pieces
- 1 can canned pineapple pieces in natural juice 8oz/250g, separate pineapple from juice
Sauce
- ½ cup sugar white or brown
- ⅓ cup apple cider vinegar
- 2 - 3 tablespoon pineapple juice from the canned pineapple pieces
- 3 tablespoon ketchup or tomato sauce (Australia)
- 1 teaspoon Worcestershire sauce Note 1
- 1 teaspoon soy sauce Note 1
- 1 teaspoon Oyster Sauce Note 1
- ¼ teaspoon salt
Thickener
- 1 tablespoon cornflour mixed with 4 tablespoon water
Instructions
Preparation
- Preheat oven to 200C/390F.
- Place chicken in a bowl, sprinkle with salt then add the egg. Mix to coat all chicken with egg, then drain out excess egg.
- Working a handful at a time, shake excess egg mixture off chicken then place chicken in ziplock bag. When all the chicken is in the bag, seal and shake well to coat chicken in cornflour. Discard excess cornflour.
- Heat oil in a large skillet on high. Add chicken in batches if necessary and cook briefly for 2 minutes, turning, just to make the outside light golden.
- Transfer to baking tray, spray with oil and bake for 15 to 20 minutes until it becomes a little more golden brown and is crispy.
Sauce Preparation
- In the skillet, discard oil and wipe briefly with paper towels. Reduce heat to medium high and heat ½ tablespoon oil. Add garlic and sauté for 20 seconds, then add onion and cook for 2 minutes.
- Add bell peppers and cook for 1 minute.
- Add Sauce ingredients. Stir until sugar has dissolved and the sauce begins to bubble.
- Add Thickener. Bring to simmer, stirring constantly, and cook until it thickens to a syrup consistency - about 3 minutes.
- Stir through pineapple pieces and remove from stove.
- Once chicken is done, add it into the skillet and toss to coat in the sauce. Serve immediately with rice or cauliflower rice.


Leave a Reply