
Introduction to Garlic Bread Rolls
There's something undeniably comforting about the aroma of fresh garlic bread rolls wafting through your kitchen. Imagine pulling apart a warm, fluffy roll, each bite bursting with the rich flavor of garlic and herbs. Making these at home is a game changer for several reasons!
Why Homemade Garlic Bread Rolls Are a Game Changer?
First off, when you create these rolls yourself, you know exactly what goes into them. No preservatives or unknown ingredients, just simple staples like flour, yeast, and those savory garlic cloves. Plus, there's a certain satisfaction that comes from baking your own bread—it's not just about the end product; it’s about the process.
Additionally, homemade rolls allow for creativity! You can adjust the filling to suit your taste—try adding a hint of chili flakes for some heat, or a sprinkle of cheese for extra indulgence. According to experts, the act of cooking at home can boost your mood and foster a sense of accomplishment.
Lastly, serving fresh garlic bread rolls at dinner gatherings makes a fantastic impression. They'll be the star of the bread basket, inviting everyone to tear, share, and enjoy! So, let’s get started on this delicious recipe that’s sure to become a family favorite.
For more details on the amazing process of making these rolls, check out our full recipe below!
Ingredients for Garlic Bread Rolls
Creating delightful garlic bread rolls is all about using quality ingredients that complement each other perfectly. Here’s a breakdown to make your preparation seamless and enjoyable!
The Dough Ingredients
- 600 g strong white bread flour (plus extra for dusting): A must for that chewy texture!
- 14 g dried active yeast: This little powerhouse helps the dough rise.
- 1 tablespoon caster sugar: Sweetness to balance the butter and garlic.
- 90 g unsalted butter (cold & cubed): Richness for flavor and a tender crumb.
- 275 ml full fat milk: Adds moisture and creates a soft dough.
- 1 medium egg: This enhances the structure and color.
- ½ teaspoon sea salt: Essential for seasoning!
The Filling Ingredients
- 45 g unsalted butter (melted): The base for a savory filling.
- 4+ garlic cloves (finely chopped): Because more garlic means more flavor!
- 1 teaspoon dried mixed herbs: A lovely blend for depth.
- ½ teaspoon sea salt: To enhance the savory elements.
- 15 g fresh parsley (chopped): A pop of freshness in every bite.
- 25 g parmesan (grated): For a hint of umami richness.
The Topping Ingredients
- 25 g parmesan: Sprinkle on top for a delicious crust.
- Fresh parsley (chopped): A colorful and fresh garnish, elevating the visual appeal.
With these ingredients, you're on your way to crafting the best garlic bread rolls! For more tips on baking bread, check out King Arthur Baking for expert advice and inspiration.
Preparing Garlic Bread Rolls
Making garlic bread rolls from scratch is a delightful experience that's sure to impress friends and family. The aroma of baking bread, combined with the luscious scent of garlic and herbs, fills your kitchen with warmth and comfort. Let's walk through the steps together; just follow along, and before you know it, you'll have a tray of delectable rolls ready to enjoy!
Prepare the Dough Mixture
To start, sift 600 g of strong white bread flour into a large mixing bowl. Add 14 g of dried active yeast, 1 tablespoon of caster sugar, and ½ teaspoon of sea salt. Mix these dry ingredients well to ensure they are evenly distributed. Next, rub in 90 g of cold, cubed unsalted butter until the mixture resembles coarse breadcrumbs. This is key to achieving that soft texture later on!
Gently warm 275 ml of full-fat milk in a saucepan until it starts to steam, but don't let it boil. Combine the milk and a medium egg with the flour mixture, stirring until a dough begins to form.
Knead the Dough Until It’s Perfect
Transfer the mixture to a floured surface and knead the dough for about 7-10 minutes. At first, the dough will be a bit sticky, but don't worry! As you work it, it will transform into a smooth, elastic ball. You can also use a KitchenAid mixer with a dough hook, which makes this process much easier, especially for beginners.
Let the Dough Rise
Once you’ve achieved that perfect consistency, place the dough in a lightly oiled bowl. Cover it with cling film and let it rise in a warm place for about 1-2 hours or until it has doubled in size. This initial rise is crucial for developing flavors in your garlic bread rolls.
Make the Garlic and Herb Filling
While your dough is rising, prepare the garlic and herb filling. Finely chop 4+ garlic cloves and 15 g of fresh parsley. Then, mix these with 45 g of melted unsalted butter, 1 teaspoon of dried mixed herbs, and ½ teaspoon of sea salt. This rich mixture will infuse your rolls with flavor!
Roll and Cut the Dough
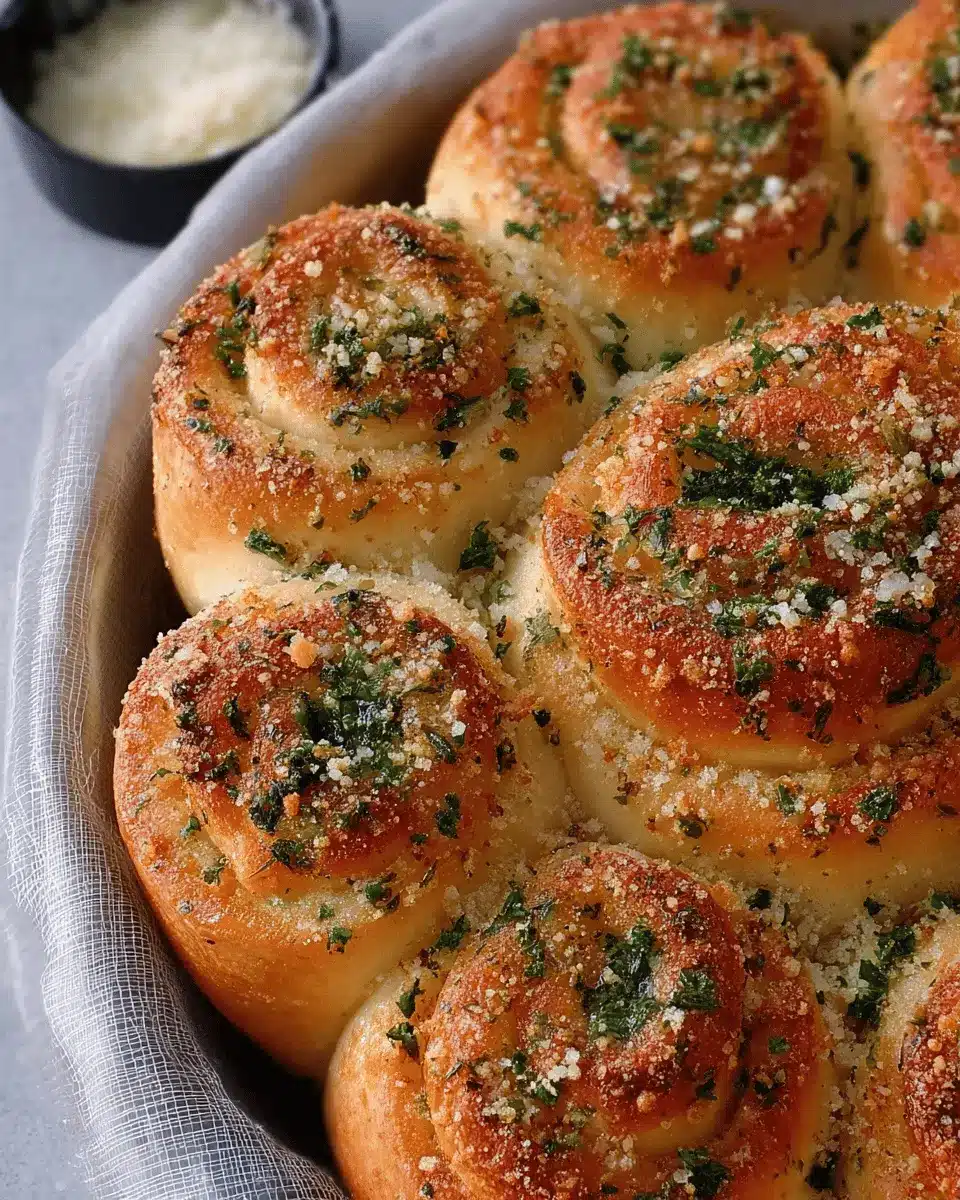
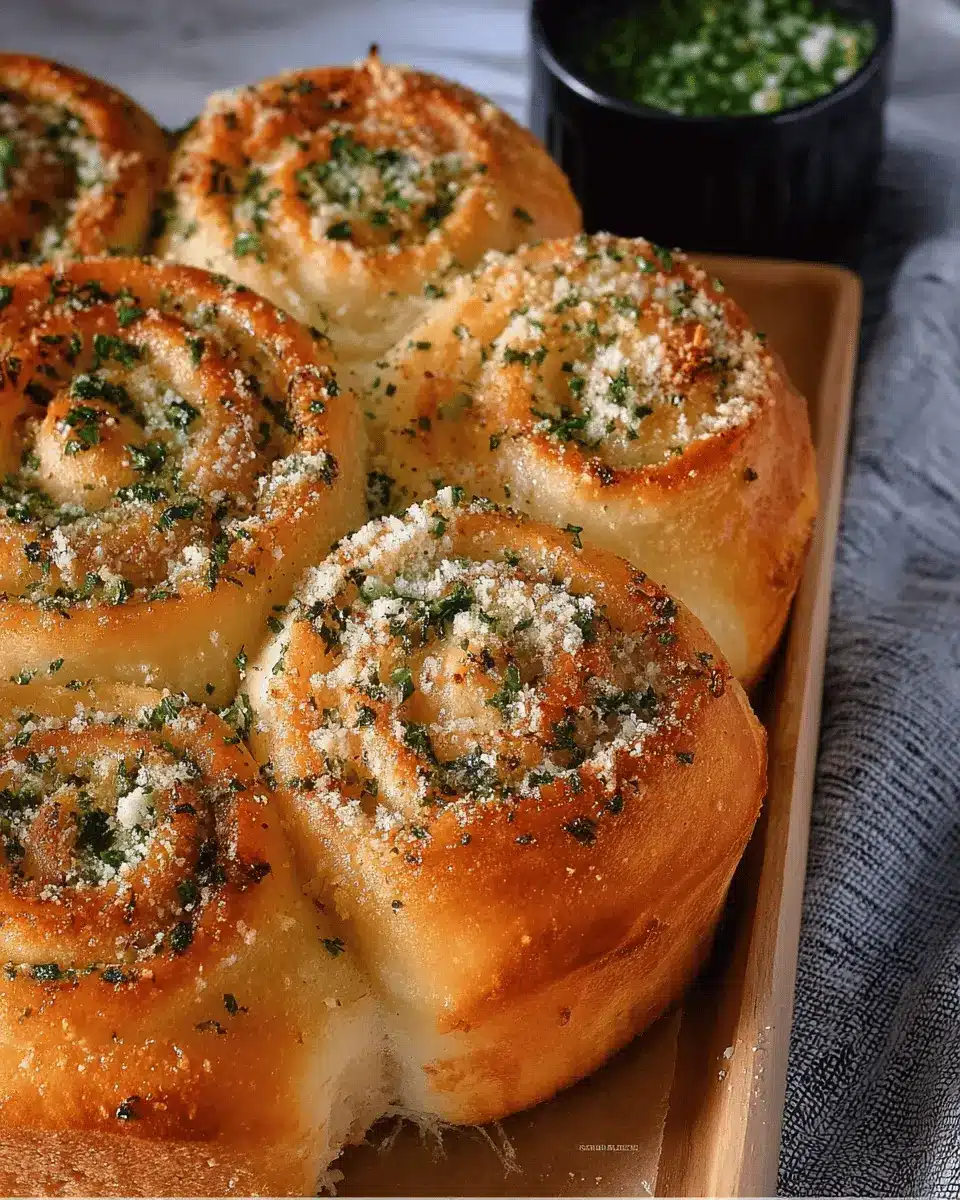
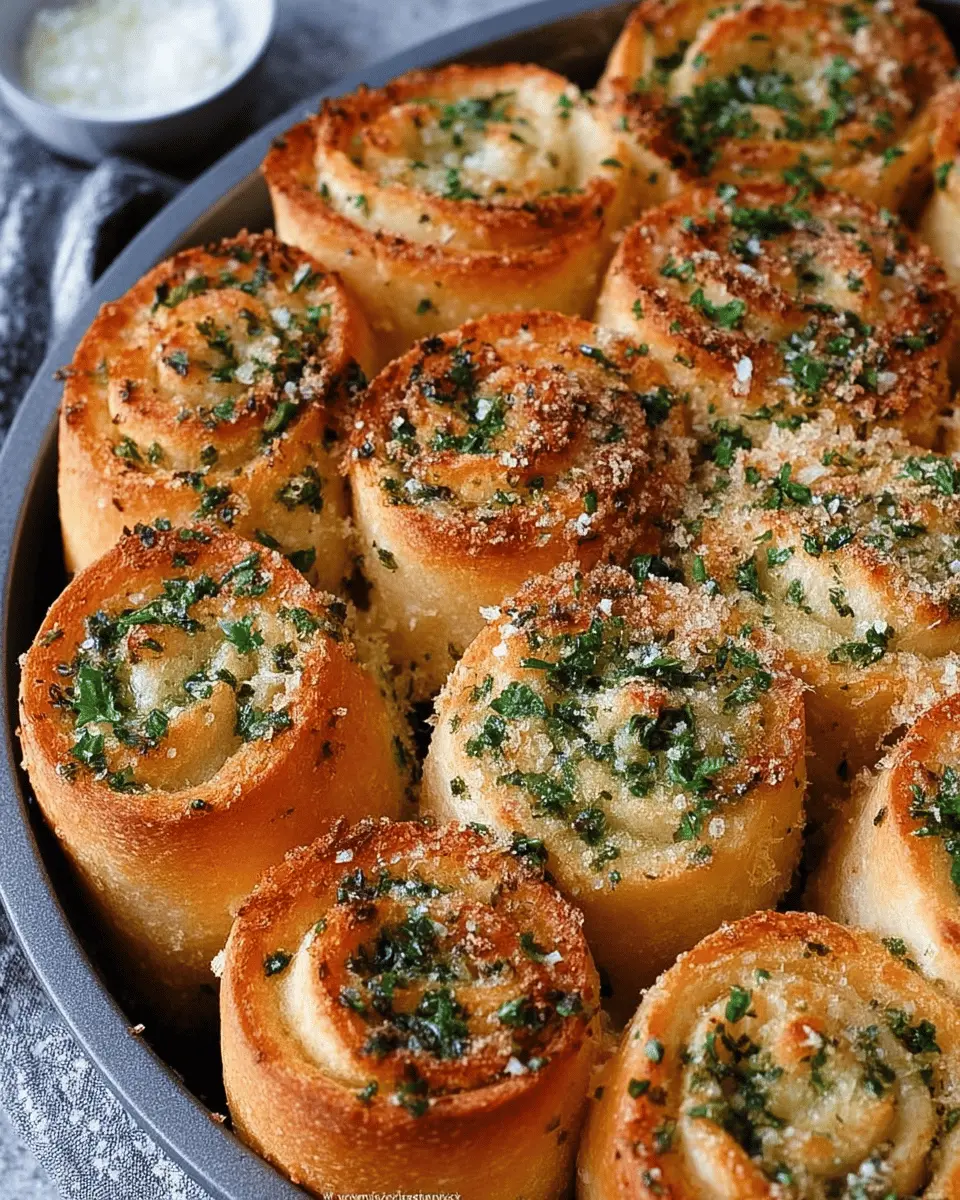
After the dough has doubled in size, turn it onto a lightly floured surface and roll it out into a large rectangle, roughly 50 cm x 30 cm. Brush your garlic-herb mixture evenly over this rectangle, then sprinkle with the remaining herbs and 25 g of grated parmesan. Starting from one long edge, roll the dough tightly to form a “sausage.” Cut this into 12 equally sized pieces.
Second Rise for Optimum Fluffiness
Place your rolls into a greased rectangular baking dish (around 30 cm x 24 cm), leaving space between each piece. Cover with cling film and let them rise for another hour. You’ll know they’re ready when the rolls are touching and puffed up—this second rise is what gives them that airy fluffiness!
Bake the Rolls to Golden Perfection
Preheat your oven to 180°C (160°C fan). Once the rolls have risen, bake for 20-25 minutes or until golden brown and cooked through. The tantalizing aroma wafting from your oven will drive everyone wild! Once cooled, top with more parsley and a sprinkle of parmesan, and enjoy your heavenly garlic bread rolls fresh out of the oven.
Now that you know how to prepare these delightful rolls, why not experiment with different fillings? Cheesy garlic rolls or even adding in your favorite herbs can take this recipe to another level! What will you try next? Happy baking!
Variations on Garlic Bread Rolls
Cheese-Stuffed Garlic Bread Rolls
Take your garlic bread rolls to the next level by adding oozing cheese! Just mix in 100-200g of grated mozzarella or your favorite melting cheese into the garlic and herb butter filling. As the rolls bake, the cheese will create a gooey, delicious center that pairs perfectly with the aromatic garlic. You can even experiment with different cheeses, like a sharp cheddar or creamy feta, to find the combination you love most.
Herb Variations for a Fresh Twist
For those looking to enhance the flavor profile of their garlic bread rolls, consider a medley of fresh herbs! Instead of sticking to dried mixed herbs, try adding fresh basil, rosemary, or thyme for a vibrant taste. You can also incorporate unique spices like smoked paprika or a hint of chili flakes for some heat. The beauty of this recipe is its flexibility, allowing you to customize with herbs that suit your palate or reflect seasonal ingredients. Try experimenting with a variety of flavor combinations to truly make these rolls your own!
Cooking notes for Garlic Bread Rolls
Tips for success
To achieve the fluffiest and most flavorful garlic bread rolls, ensure your dough rises in a warm environment. If you can, use a kitchen thermometer to keep the milk warm but not too hot—aiming for 37°C (98°F) works well. Don’t rush the proving time; patience here is key! If you want a cheesier option, consider adding mozzarella to the filling for an extra gooey surprise.
Storing tips for freshness
For optimum freshness, store your garlic bread rolls in an airtight container or wrap them in foil at room temperature. They’ll keep for about two days. If you’re planning to enjoy them later, freeze them after baking. Just make sure to thaw and warm them up in the oven for that freshly-baked taste. For more storing ideas, check out this guide on bread preservation techniques from The Kitchn.
Serving suggestions for Garlic Bread Rolls
Perfect pairings with meals
These garlic bread rolls shine when paired with a variety of meals. They complement hearty dishes like spaghetti and meatballs, creamy mushroom risotto, or even a fresh garden salad. Imagine tearing into these warm rolls alongside a cozy bowl of soup — perfect for those chilly evenings! For meat lovers, they also go wonderfully with grilled chicken or turkey bacon. For a unique twist, serve them with a vibrant tapenade or hummus for dipping!
Creative serving ideas for gatherings
Hosting a gathering? Create a garlic bread rolls platter! Arrange warm rolls in a woven basket lined with a colorful cloth and serve with different flavored butters, such as herb-infused or spicy chili butter. You could even pair them with a selection of cheeses for a delightful charcuterie spread. Want to impress? Stuff the rolls with gooey cheese or savory pesto for a delightful surprise. Your friends will be raving about these rolls long after the party’s over!
For even more serving ideas, check out this guide to bread pairings to elevate your culinary experience.
Time Breakdown for Garlic Bread Rolls
Preparation Time
Get ready to unleash your baking skills! The preparation for these delightful garlic bread rolls takes about 35 minutes. This includes mixing the ingredients, kneading the dough, and preparing the aromatic filling. Pro-tip: Have your ingredients measured out beforehand to streamline the process!
Cooking Time
Once your rolls are resting and rising, it’s time to bake! The cooking time is approximately 25 minutes. You'll want to keep an eye on them as they turn golden brown and your kitchen fills with the irresistible scent of garlic.
Total Time
In total, you’re looking at about 4 hours for the entire adventure from start to finish. This includes the proving time of about 3 hours while the dough rises and develops a wonderful texture. Perfect for a lazy weekend or when you want to impress friends with homemade goodness!
Feel free to check out this helpful guide on bread baking basics to boost your skills! Happy baking!
Nutritional facts for Garlic Bread Rolls
Calories per roll
Each garlic bread roll contains approximately 150 calories. This makes them a delightful, treat-worthy addition to any meal without overwhelming your daily caloric intake. Perfect for sharing (or not!), they're an indulgent yet manageable option.
Key nutrients
These rolls not only deliver on flavor but also provide essential nutrients, including:
- Carbohydrates: A primary energy source to fuel your day.
- Protein: Helps with muscle repair and growth, thanks to the milk and egg.
- Calcium: Contributed by cheese, supporting bone health.
- Vitamins: Garlic and herbs add antioxidants for a bit of a health boost.
For a deeper dive into the nutritional benefits of garlic, check out this informative article from Healthline. Enjoy these garlic bread rolls as a delicious way to complement your diet!
FAQs about Garlic Bread Rolls
Can I freeze garlic bread rolls?
Absolutely! Garlic bread rolls freeze wonderfully. Just make sure they've cooled completely after baking. Place them in an airtight container or freezer bag, separating layers with parchment paper to prevent sticking. They can last for about three months in the freezer. When you’re ready to enjoy them, simply thaw at room temperature and warm them in the oven for that fresh-baked taste.
What can I substitute for the butter?
If you’re looking for a butter alternative, olive oil is a fantastic option. It complements the garlic flavors beautifully and adds a lovely richness to your rolls. You can also consider vegan butter or avocado for a healthier twist, keeping the delightful taste intact.
How can I increase the garlic flavor?
To amp up the garlic flavor in your rolls, you can add more finely chopped garlic cloves to the filling based on your preference. Roasting the garlic beforehand will provide a sweet and mellow taste. Additionally, try incorporating garlic powder or garlic-infused oil; both can give a delightful depth of flavor to your garlic bread rolls.
For further reading on substitutes and flavor enhancements, check out BBC Good Food for expert tips!
Conclusion on Garlic Bread Rolls
Why you need to make these rolls today!
There's no need to wait for a special occasion to enjoy these garlic bread rolls! Bursting with flavor and easy to make, they’re perfect for sharing with friends or enjoying alongside your favorite pasta dish. Whip up a batch today to elevate your mealtime experience!

Garlic Bread Rolls!
Equipment
- large bowl
- baking dish
- KitchenAid
- Dough Hook
- pastry brush
Ingredients
The Dough
- 600 g strong white bread flour plus extra for dusting
- 14 g dried active yeast
- 1 tablespoon caster sugar
- 90 g unsalted butter cold & cubed
- 275 ml full fat milk
- 1 medium egg
- 0.5 teaspoon sea salt
The Filling
- 45 g unsalted butter melted
- 4+ cloves garlic finely chopped
- 1 teaspoon dried mixed herbs
- 0.5 teaspoon sea salt
- 15 g fresh parsley chopped
- 25 g parmesan grated
The Topping
- 25 g parmesan
- fresh parsley chopped
Instructions
Preparation
- Sift the flour into a large bowl, and add the caster sugar, yeast and sea salt. Mix these together so its all evenly distributed.
- Rub the butter into the mixture so it resembles bread crumbs.
- Gently heat the milk until warm - but not piping hot.
- Add the milk and egg to the dry ingredients.
- Knead the dough together for 7-10 minutes.
- Once kneaded, it will be springy to touch, and not sticky.
- Transfer into a lightly oiled bowl, cover with cling film and let it rise for 1-2+ hours.
- Whilst the dough is proving, prepare the filling by finely chopping the garlic and prepping the parsley.
Baking
- Once the dough has risen, roll out to a large rectangle.
- Mix the garlic into the melted butter, and brush over the bread dough.
- Sprinkle over the mixed herbs, sea salt, chopped parsley and parmesan.
- Roll the dough from long side to long side and cut into 12 pieces.
- Place in a baking dish and cover with clingfilm to rise for another hour.
- Preheat the oven to 180C/160CFan.
- Bake for 20-25 minutes until golden brown.
- Leave to cool, then sprinkle with fresh parsley and parmesan.

Leave a Reply